
![]()
___________________________________________________________
FreeDS is an attempt at
creating an open source
land surveying application
for the HP 48. It is also an
attempt at promoting a concept diametrically opposed
to the ubiqitious window, menu
list, 'choose box' paradigm.
FreeDS is command line and
stack oriented. All user functions are accessed from
the first three pages of the VAR
Menu and from the keyboard.
A keyboard template image is included. You have to
supply your own printer,
x-acto knife and protective
spray and/or tape.
My MSDOS program SkiVert is used to convert comma-delimited
coordinate
files to the HP48 directory type
file used by FreeDS, and vice versa, as
well as producing dxf's.
I use Ripterm or Kermit for file transfer.
Also included is Freeds.E48, KMLs and bitmaps for Emu48.
Thanks to Mike Morris for the
Topcon communications source. And, regarding the
Emu48 version of FreeDS, thanks
to Casey Patterson for the Float_GX files;
I based my FreeDSsmall files on
them. Thanks to Jeffery L. McMahon for the
Jemac files.I based my full
scale graphic on them.
This document is not as
complete as I would like at this time. Additional
explanations, examples, etc.
will be provided with updates.
___________________________________________________________
Installation
Make sure your IO settings are as follows:
For PC to 48GX: wire, ascii, 9600, 0, 3, 1
For 48GX to 48GX: IR, binary, 9600, 0, 3, 1
Send the 'Kogo' file to your HP
using Kermit. This can be done with
the Kermit program, Ripterm, or
any serial communications program
which supports the Kermit
protocol. Insure that the filename as saved
on the calculator is uppercase
"K", lowercase "ogo".
After the transfer is done,
switch to the Kogo subdirectory on your HP.
Type U K S . (Include the period at the end.) A
list will appear on the
stack. This is the "User" key
assignment list.
Press [Left-Shift] [CST] [KEYS] [STOK] . The list is now saved in
memory, and will be referred to
when "User" Mode is active.
Next, type 4 [ENTER] [alpha] [alpha] F I X .
If you prefer the date and time
display, press
[Right-Shift] [CST] [ ^] [ CHECK ] [OK] .
Finally, set "User" Mode by
typing 62
[+/-] [alpha] [alpha] S F .
___________________________________________________________
The Kogo Subdirectory
This program exists as User RPL
coded program and data variables in
the Kogo subdirectory, accessed
via the VAR Menu. The VAR key is
labeled MAIN on the keyboard template @ key
24.1. Pressing it will
return you to the first page of
the VAR Menu. All functions are designed
to be used from the Kogo
directory. Although it's possible to use some
functions from job
subdirectories or elsewhere without generating error
messages or spurious output,
FreeDS has not been completely idiot-
proofed at this time.
Idiot-proofing has been implemented in areas where
errors would be fatal.
___________________________________________________________
The Keyboard Template
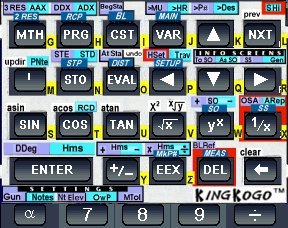
Function locations were designed
with preservation of useful native
commands in mind. Certain
functions are grouped by usage context.
They occupy a common key, or if
spanning multiple keys, are
bordered in black. At four
locations function names lie on a red
background. These are associated
with instrument communications.
___________________________________________________________
Creating (or Switching) Job Directories
VAR Menu
Page 2 ![]()
The JOBS. directory
is reserved for subdirectories
created
using ->JOB. If a subdirectory by the name
submitted already
exists, that subdirectory
becomes the target for computations
involving point data. ex: [alpha] [alpha] OAKSPRINGS
->JOB.
If you have trouble remembering
a jobname, go to the JOBS.
subdirectory, press [ ' ] [ jobname ] MAIN NXT
->JOB.
___________________________________________________________
Storing Point Data with STP.
![]()
![]()
Overwrite protection (Flag 23)
is set or cleared using OwP on the
keyboard template @ key 62.3, in
the "SETTINGS" group.
Point data exists as list
objects stored in variables. Due to the
variable naming convention of
the 48, these variables begin with
an alpha character, in this case
"P", which is automatically
prefixed to the numeric part of
the variable name when stored
using STP , found on the keyboard template @
key 32.1, or the
first page of the VAR menu ( MAIN ). Storing a northing and easting
or northing, easting,
description as an unused P#, or existing P#
if OwP is off is as follows:
N E P# STP
or N E
D P# STP
You'll notice that the point
number is returned to the stack with a
P prefix. Point numbers are
named in this fashion and used
for point data storage. Point
data ( n e z d ) is saved as a
LIST object.
A default Z value ( 0 ) and
description (as set w/ >Des on the
keyboard template) are saved
along with the given N and E
when using the first example.
The result might look
like this: {5000 5000 0 PROPCOR
}.
The result using the second
example might be like this:
{5000 5000 0 TRAV }. By
including the description for storage,
the default description is
ignored. If you wish to save coordinates and
are unconcerned about
descriptions, use a single character for the
default description to save
memory.
Storing elev. using exist point#. (OwP status disregarded.):
Z P # STE
Storing description using exist point#. (OwP status disregarded):
D P # STD
The procedure for quickly
storing all point data
using the above commands is as
follows:
N E D P# STP Z SWAP STE
An efficient solution would be
to store groups of points with
like descriptions, setting the
default description with >Des
beforehand. The elevation would
be stored as above, by entering
it last, then SWAP STE .
>Des comes in handy when saving groups
of like descripted points,
though note that >P#, located left of>Des @ key 25.2, cannot be
used to manually store point
data sequentially. These functions, along
with the others in their group,
>MU("Measure Up") and >HR (Height of
Rod) are typically used prior to
saving a point measurement w/ STP
during data collection.
Sequential point numbering is done automatically
at this level, with the option
of changing the next point number,
description or rod height.
___________________________________________________________
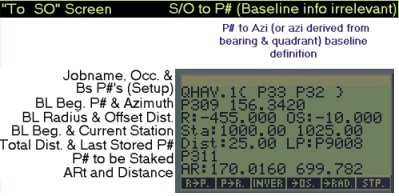
Radial Stakeout by Point#
![]()
Use SO for radial stakeout by point#, SO+ and SO- for the same thing
w/ incremented or decremented
point#'s. An angle right and distance is
generated and put on the stack.
You can also recall this information via
the To SO screen.
![]()
___________________________________________________________
Stakeout Measurement
![]()
MEAS can be used after a point stakeout
using SO. If GUN is OFF,
manually keying in the
measurement and pressing MEAS generates
a come or go value. No provision
for vertical information exists if using
MEAS manually. If GUN is ON, pressing MEAS initiates an instrument
measurement, and generates the
As So (As Staked out) screen.
Stack after manual MEAS


(By the way, if the numbers don't seem to work in
the screen above, it's because
they don't! It was generated using Emu48 without
the benefit of a total station,
and is intended for layout illustration only)
___________________________________________________________
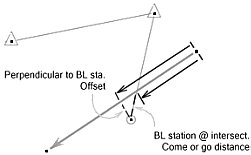
Radial Stakeout to a Line
![]()
BL is used to set up a line, using a
beginning point# and ending point#,
azimuth or bearing/quadrant#.
Subsequent use of BegSta, At
Sta, DIST ,
->OS., or ->RAD. puts an angle right, distance, and
N, E values on the
stack, and generates the To SO screen.
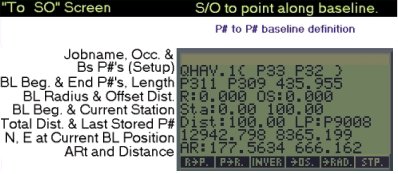
The coordinate can be saved
with STP . Note that it is NOT necessary to
save coordinates prior to
getting stakeout data.
BL needs help in telling whether the
object on stack level 1 represents an
azimuth, quadrant or point#.
Since the object at level 2 (if we're working with
an azimuth or two
point#'s) is by default a point#, we need only to distinguish
the second point# by prefixing
it with a 'P '. This can be done with the alpha
function as in [alpha] P 200 [ENTER ], or more efficiently by keying in
the
point# and pressing MkP#
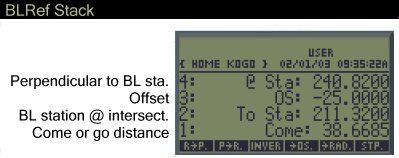
Another line stakeout method is
BLRef (Left-Shift MEAS). BLRef can use
a coordinate generated by manual
SS, a point# (prefixed w/ MkP#), or the
measurement list produced by SS w/ GUN ON. BLRef then generates
reference information to guide
the rodperson.
___________________________________________________________
Saving Sideshot and Stakeout
Measurements with STP.
![]()
![]()
Enabling or disabling
instrument communication is done w/ GUN ON/OFF.
Pressing Left-Shift [Alpha]
toggles Topcon communications on and off.
With GUN OFF, the SS (Sideshot) routine takes an angle
right and distance
as arguments, returning a
northing and easting to the stack, ready for storage.
If GUN is ON, SS ignores the stack. Instead it gets
the angle and distance
information from the Topcon.
When an observation is obtained
from the instrument using SS or MEAS (after
a point stakeout using SO ), the pending P# is placed in a
LIST object along with
the received slope distance,
zenith angle and horizontal angle
{P123 100.7798 90.3015 310.1545 }
Afterwards, STP can be used to compute xyz
coordinates and store the shot.
(w/ Notes ON, raw data is saved too.)
STP computes rectangular values based
on the instrument data and the
values set by the functions
listed below:
![]()
>MU The
"measure up" - from occupied point to instrument
>HI
Instrument
Height - relative to sealevel - ( This is not accessed
via the keyboard template, but
can be used from the VAR Menu)
>HR
Rod Height
>P#
Pending
Point#
>Des
Pending Description
At any time prior to or after
using SS or MEAS, and prior to using STP ,
you can change the current rod
height, point#, and description to modify the
point data. The point number is
automatically incremented for the next shot.
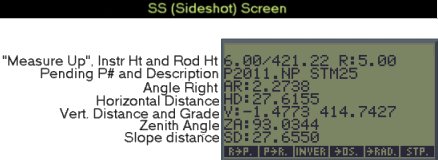
Using STP after SS with the observation LIST at stack
level 1 produces results
similar to using STP after MEAS, with the "Come" or "Go" string
generated by
MEAS at stack level 1.
"Go:12.34"
The instrument measurements
LIST is put on the stack by SS; MEAS
returns a "Come:" or "Go:"
string. STP tests for the data type and acts
accordingly. Why is the LIST not
at level 1 in both cases?
Distinguishing SS and MEAS derived output is necessary so
these procedures
can be properly formatted and
appended to the string saved as the 'NOTES.'
variable. With Notes ON, measurements are recorded in a
readable format,
analogous to hand written field
notes, including enough information to serve
as a report file. The NOTES. variable contains a string (ie.
text file) to which
measurements are appended by STP while Notes is ON.
Associated with Notes is Nt Elev , an ON\OFF toggle for vertical
information
to NOTES., and PNte , a point lister.
Sample NOTES. string (w/ Nt Elev OFF):
Header:
%%HP:
T(1)A(D)F(.);
Begin
String:
"
Title:
Morrison
- Lot 64
Date:
02-02-02
Crew:
Smith
Bruce
List point
data:
P5013{4899.6397
5485.3933 0.0000 TRAV }
List point
data:
P5001{4261.3976
5524.3426 0.0000 P }
Occupied &
Backsight:
T@
5013 Bs 5001
Stakeout point# &
description: SO (5001) 'LOTCOR'
ARt and
HD:
0.0000
639.4300
S/O pnt
recorded:
Rec
as (5053) 'BSCHECK'
ARt and
HD:
0.0001
639.4400
Sideshot point# &
description: (5054) 'HSECOR'
ARt and
HD:
24.1033
52.8100
(5055) 'EPOLE'
166.2053 12.3100
(5056) 'WELL'
32.1043 162.4500
Stakeout point# &
description: SO (5014) 'LOTCOR'
ARt and
HD:
294.0537
489.9800
S/O pnt
recorded:
Rec
as (5057) 'CHK'
ARt and
HD:
294.0545
490.0200
Sideshot point# &
description: (5058) 'FLY'
ARt
1)112.0522
Rep
2)224.1046
Mean ARt and
HD
M)112.0523
307.5500
More NOTES. examples can be viewed, one with NtElev ON,
and one with multiple angles (ARep).
___________________________________________________________
Intersections and Resections
![]()
All of the routines listed in
this section solve for the coordinate of one
unknown point.
2 RES ( 2 Point Resection)
Technically not employing
'resection' calculations but involving a bearing
rotation solution, this
procedure is sometimes referred to as 'free stationing'.
It uses two known points, a
backsight distance, angle right and foresight
distance.
Enter two point#'s, a distance,
an angle right, and a distance.
112 201 57 326.2318 302.0937 2 RES
3 RES (3 Point Resection)
(Collins Method) With 3 RES a all you need are three known
points and two angles.
Since distances are not
necessary, this eliminates the need for a
rodperson's presence at any of
the points as long as they are visible.
Which pretty much means you'd be
sighting building corners, radio towers,
Enter 3 point#'s and two angles in the order of observation.
112 201 57 326.2318 302.0937 3 RES
AAX ( Azimuth - Azimuth Intersection)
I saw no point in enabling the
use of bearings and quadrants; It
seems a small thing to convert
them yourself.
Enter the first point#, azimuth,
second point#, and azimuth.
42 107.1829 44 05.1749 AAX
DDX ( Distance - Distance Intersection)
As you know, there are two
solutions to any distance - distance
intersection problem. This
routine returns one solution. You determine
which one by entering the known
points and distances in sequence so
that the solution lies to the
right, or clockwise (less than 180 degrees)
fromthe known points.
Enter the first point#, distance
from it, second point#, and
distance.
109 32.67 111 50.00 DDX
ADX( Azimuth - Distance Intersection)
Enter the first point#, the azimuth, the second point# and the distance.
42 232.47 44
325.1209 ADX
___________________________________________________________
Command List
Ordered by Menu and Template
Position
Listed below are all of the
FreeDS user functions and some
native keyboard functions
preserved for convenience. Detailed
descriptions not already
provided will be included with document
updates.
VAR Menu
Page1
![]()
R->P.
Rect
to Pol
P->R.
Pol
to Rect
INVERS.
Point
Inverse
->OS.
Baseline
Offset Distance
->RAD.
Baseline
Radius Distance
stp.
Store
point (calls STP.)
Page 2
![]()
->HI.
Height
of Instrument
->HR.
Height
of Rod
TLEV.
Trig
Levels - VD; ( Uses HI. and HR. )
DLEV.
Differential
Levels; ( Uses HI. )
->JOB.
Create
/ Switch Job
JOBS.
JOBS.
Subdirectory
Page 3
![]()
ABC.
Area
by Coordinates
RC>A.
Radius,
Chord; produces Area Under Arc, Arc Length
BEAM.
(Used
w/ Alidade and Plane Table) Distance,
Beamon Arc Reading and Rod
Reading for
Ground Elev @ Rod
LEVL.
(Used
w/ Alidade and Plane Table) Rod Reading
for Ground Elev @ Rod (when
alidade is level)
___________________________________________________________
User Keys
Label ( Program
Name )
Description
![]()
2 RES ( RESCT.
)
Two
Point Resection
3 RES ( TPRS.
)
Three
Point Resection ( Angles Only )
AAX ( BBINX.
)
Azimuth
- Azimuth Intersection
RCP ( RCP.
)
Recall
Point Northing & Easting
DDX ( NDDX.
)
Distance
- Distance Intersection
ADX ( BDINX.
)
Azimuth
- Distance Intersection
![]()
BL ( BL.
)
Establish
Baseline by Point # - Point #,
Point # - Azimuth or Point # -
Bearing - Quadrant #
BegSta ( STA1.
)
Beginning
Baseline Station
MAIN ( S2M.
)
Default
to 1st Page of VAR Menu
>MU ( MUPR.
)
"Measure
Up" ( For Height of Instrument )
>HR ( >HR.
)
Height
of Rod
>P# ( >PNT.
)
Set
Pending Point #
>Des ( >DESC.
)
Set
Pending Description
prev ( PREV
)
(Native
Command) - PREVious Menu Page
SHI ( HIGET.
)
Establish
Instr. Ht. by BM Shot
![]()
updir ( BUPDIR.
)
UPDIRectory
- Will not go above 'FReeDS' to HOME
PNte ( SPCTN.
)
Write
Point data to NOTES., and Display
STP ( STP.
)
Store
N, E or N, E, Desc as Point #
STE ( STOEL.
)
Store
Z to Ex. Point #
STD ( STOD.
)
Store
Description to Ex. Point #
![]()
DIST ( DIST>.
)
Distance
Interval along Baseline
To Sta ( STA2.
)
Stake
at Station Value along Baseline
UNDO ( UNDO
)
(Native
Command)
SETUP ( MKPNSETUP. )
Establish Occupied and Backsight Point #'s
HSet ( TOPHSET.48G
) Set Instrument Hz Angle
Trv ( AHD>.
)
Occupy
New Point# , Backsight
previously occupied Point #
![]()
To So ( SHOWD.
)
Displays
"To be Staked Out" parameters
As So (
SHOWD2.)
Displays
"As Staked Out" measurements
SS ( 27 SF RECSHT. VSTR. )Displays
Sideshot measurements
Gen ( SETSHOW.
)
The
General Settings Info Screen
Label ( Program Name ) Description
![]()
SO ( MKPNSO.
)
Stakeout
Point #
SO+ ( INCRN.
)
Stakeout
Next Point #
SO- ( INCRP.
)
Stakeout
Prevous Point #
SS ( SS.
) Sideshot
OSA ( AOS.
)
Angle
Offset
ARep ( ADBL.
)
Angle
Repetition
![]()
DDeg ( HMS>
)
(Native
Command)
HMS ( >HMS
)
(Native
Command)
HMS+ ( HMS+
)
(Native
Command)
HMS- ( HMS-
)
(Native
Command)
MkP# ( MKPN.
)
Mark
Integer as Point # ( As Needed for BL., etc. )
HMSx ( HMSM.
)
HMS
Multiply
HMS/ ( HMSD.
)
HMS
Divide
MEAS ( SCD.
)
Measure
Stakeout
BLref ( A2L.
)
Reference
Point or Sideshot to Baseline
![]()
clear ( CLEAR
)
(Native
Command) - Clear Entire Display
![]()
Gun ( GOGO.
)
Gun
Comm On/Off
Notes ( NOTER.
)
NOTE.
On/Off
Nte Elev ( ELO.
)
NOTE.
Elevations On/Off
OwP ( OWPSET.
)
Overwrite
Protect On/Off
Mtol ( ATOLSET.
)
Set
Mean Tolerance ( for ARep )
___________________________________________________________