
|
By Richard
A. Smith KingKogo started out as a massive keystroke program for the HP 42S. I no longer own a 42S, and the handwritten stack of code created and modified from 1990 to 1994 is in a box waiting to be transcribed for emulator use. The original HP 48GX page can be viewed here. I called it FreeDS originally, as a play on TDS. KingKogo is an open source, free data collection, cogo and stakeout application for the HP 48, 49 and 50 series calcu- lators. The program code is identical for all three, except for the user key assignment list. With KingKogo I am pro- moting a concept diametrically opposed to the ubiqitious window,menu list, 'choose box' paradigm employed by TDS and other products for the HP 48GX. KingKogo
is command line and stack oriented. All user You have to supply your own
printer, x-acto knife, protective |
I have included kogo.E48, KMLs and bitmaps for the Thanks goes to Mike
Morris for the Topcon communications |
|
Installation Make sure your IO settings are as follows: For PC to 48GX: wire, ascii, 9600, 0, 3, 1 For 48GX to 48GX: IR, binary, 9600, 0, 3, 1 Send the 'Kogo' file
to your HP using Kermit, Ripterm, or any your HP. Type U K S . (Include the period at the end.) A list will appear on the stack. This is the "User" key assignment list. Press [Left-Shift] [CST] [KEYS] [STOK]. The list is now saved in memory, and will be referred to when "User" Mode is active. Next, type 4 [ENTER] [alpha] [alpha] F I X. If you prefer the date and time display, press [Right-Shift] [CST] [ ^] [ CHECK ] [OK] . Finally, set "User" mode by typing 62 [+/-] [alpha] [alpha] S F . |
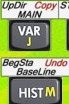
The Kogo Subdirectory KingKogo exists as User RPL coded program and data variables in the Kogo subdirectory, accessed via the VAR Menu. The VAR key is labeled MAIN on the key- board template @ key 24.1. Pressing it will return you to the first page of the VAR Menu. All functions are designed to be used from the Kogo directory. Although it is possible to use some functions from job subdirect- ories or elsewhere without generating error messages or spurious output, KingKogo has not been completely idiotproofed at this time. Idiotproofing has been im- plemented in areas where input errors would cause major recovery headaches. |
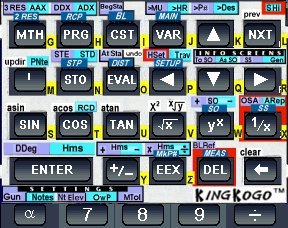
| __________________________________________________________________________________________________________ The Keyboard Template Though I did use this program with the HP 49G, and it did function correctly, with or without the Topcon, the 49G itself was a nightmare to use. I never did make a keyboard template for it. I threw the calculator against a tree one day, and took it apart later, never to be used again. So, if you actually use a 49G and want to use KingKogo on it, you can study the following template images and make your own, customized for the 49G. |
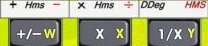
| Function locations were designed with
preservation of useful native commands in mind. Certain
functions are grouped by usage context. They occur on a common key, or if spanning multiple keys, are bordered in black on the 48GX example. At four locations function names lie on a red background. These are associated with instrument communications. Again, this not the case for the Emu48 and 50G versions, as I decided that those particular schemes compromised readability on the small Emu48 display, and were not critical in any case. I feel it looks kind of cool on the 48, so I've left it alone. |
___________________________________________________________________________________________________
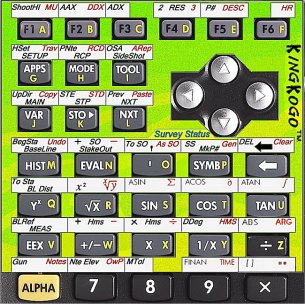
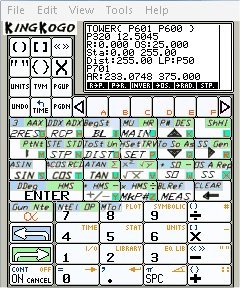
| The following section consists of
command listings and usage instructions. Screen output images, including VAR menus are essentially the same for the 48 and 50 series. As far as the template images go, the blue and purplely key headings are 48GX examples, the white headings with greenish background are of the 50G. Yeah, there's no 49G images. I'm sorry if you are using a 49G and are interested in KingKogo. Well, I'm just sorry if you really are using a 49G. In the following section, you will notice numerical key designations from time to time, such as "STP @ key 32.1". These only apply to the HP 48GX or the emulator, not the HP 50G. The images alone should guide you. This document was originally written before the 49 or 50G calculators came into existence, and is still very 48-centric. That being said, you should be able to get by with the keyboard images. Also, due to additional space because of design, I was able to spell out certain commands such as "Stakeout" instead of SO, Desc instead of DES when making the 50G's template. These discrepancies should be of mini- mal impact if you look at the context in which the command is being discussed. |
|
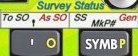
Creating (or Switching) Job Directories VAR Menu
Page 2 using ->JOB. If a subdirectory by the name submitted exists, that subdirectory becomes the target for point data computations. Ex: [alpha] [alpha] OAKSPRINGS ->JOB. If you have trouble remembering a jobname, go to the JOBS. sub- directory, press [ ' ] [ jobname ] MAIN NXT ->JOB. _____________________________________________________ Radial Stakeout by Point#
Use SO for
radial stakeout by point#, SO+ and SO-
for
 _________________________________________________________ Stakeout Measurement
MEAS can be
used after a point stakeout using SO. If GUN Stack after
manual MEAS   (By the way, if the numbers on the depicted screens don't seem to work mathematically in it's because they don't! They were generated using Emu48 without the benefit of a total station, and are intended for layout illustration only) _________________________________________________________ Radial Stakeout to a Line
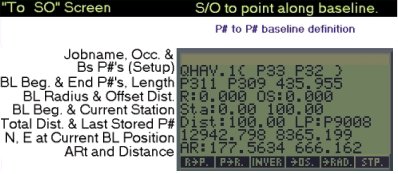
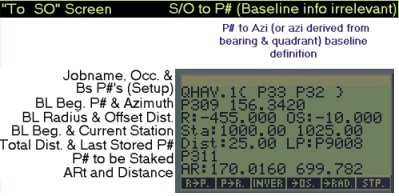
BL is used to
set up a line, using a beginning point# and
The coordinate can be
saved with STP . Note that it is
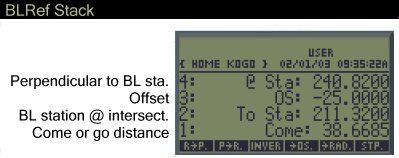
Another line stakeout
method is BLRef (Left-Shift MEAS). 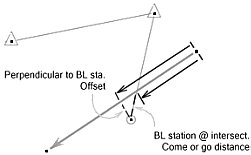 ________________________________________________________ Intersections and Resections
All of the routines
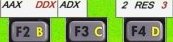
listed in this section solve for the coordinate 2 RES ( 2 Point
Resection) 112 201 57 326.2318 302.0937 2 RES 3 RES (3 Point
Resection) Enter 3 point#'s and two angles in the order of observation: 112 201 57 326.2318 302.0937 3 RES AAX ( Azimuth -
Azimuth Intersection) 42 107.1829 44 05.1749 AAX DDX ( Distance -
Distance Intersection) 109 32.67 111 50.00 DDX ADX( Azimuth -
Distance Intersection) |
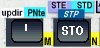
Relevant Settings
and Storing Point Data
Overwrite protection
(Flag 23) is set or cleared using OwP on
N
E P# STP You'll notice that the
point number is returned to the stack with A default Z value ( 0
) and description (as set w/ >Des on the Storing elev. using exist point#. (OwP status disregarded.): Z P# STE Storing desc. using exist point#. (OwP status disregarded): D P# STD The procedure for
quickly storing all point data N E D P# STP Z SWAP STE An efficient solution
would be to store groups of points with points, though note that >P#, located left of >Des @ key 25.2, cannot be used to manually store point data sequentially. These functions, along with the others in their group, >MU ("Measure Up") and >HR (Height of Rod) are typically used prior to saving a point measurement w/ STP during data col- lection. Sequential point numbering is done automatically at this level, with the option of changing the next point number, description or rod height. ___________________________________________________________ Relevant Settings
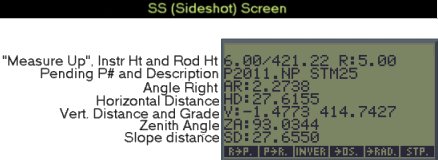
and Saving Sideshots &
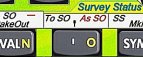
Enabling or disabling
instrument communication is done w/ With GUN OFF,
the SS (Sideshot) routine takes an angle {P123 100.7798 90.3015 310.1545 } Afterwards, STP
can be used to compute xyz coordinates STP computes
rectangular values based on the instrument
>MU
The
"measure up" - from occupied point to instrument
At any time prior to
or after using SS or MEAS, and prior
to
Using STP
after SS with the observation LIST at stack
level 1 produces "Go:12.34" The instrument
measurements LIST is put on the stack by SS; Sample NOTES. string (w/ Nt Elev OFF): Header:
%%HP:
T(1)A(D)F(.); List points using
PNte: P5013 {
4899.6397 5485.3933 0.0000 TRAV } Occupied &
Backsight:
T@
5013 Bs 5001
|
|
Command List
Listed below are all
of the KingKogo user functions and some VAR Menu Page1 Page 2  ABC. Area by Coordinates RC>A. Radius, Chord; produces Area Under Arc, Arc Length BEAM. (Used w/ Alidade and Plane Table) Distance, Beamon Arc Reading and Rod Reading for Ground Elev @ Rod LEVL. (Used w/ Alidade and Plane Table) Rod Reading for Ground Elev @ Rod (when alidade is level) ___________________________________________________________ |
User Keys Label ( Program Name ) Description
  Gun ( GOGO. ) Gun Comm On/Off Notes ( NOTER. ) NOTE. On/Off Nte Elev ( ELO. ) NOTE. Elevations On/Off OwP ( OWPSET. ) Overwrite Protect On/Off Mtol ( ATOLSET. ) Set Mean Tolerance ( for ARep ) |